
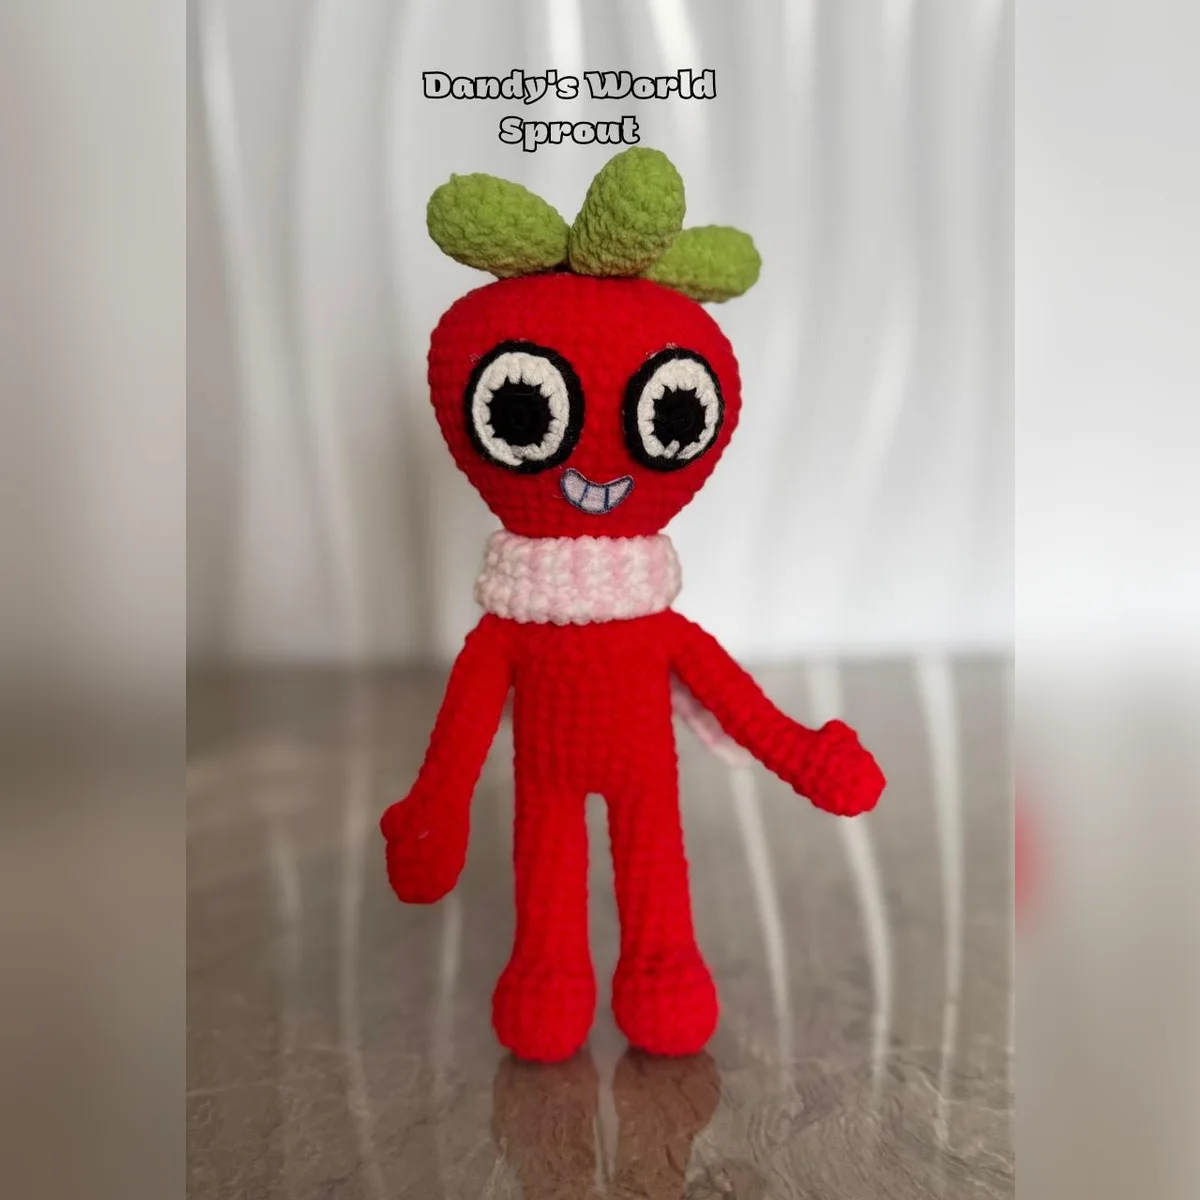
Crochet your own Sprout from Dandy's World with this free amigurumi doll pattern – a cute crochet strawberry plushie for fans of the Roblox game. Sprout is the cheerful strawberry toon with a big round head, a leafy green top, googly eyes and a cozy striped scarf. Made in soft chenille yarn, he stands about 20 cm (8 in) tall and has bendable arms thanks to a little wire inside.
The legs, body and head are crocheted in one piece, so there is very little sewing. Every tricky step has a photo – bookmark this page (or save it to Pinterest) and follow along with your hook.
Love Dandy's World crochet? You'll find more detailed amigurumi patterns and ready-made toys in my Etsy shop HandmadePhuongGifts.
Materials & tools
- Body, leaves & scarf: soft chenille yarn, approx. 2.5–3.0 mm, 100% polyester – red, light green, white and light pink; 2.5 mm crochet hook (or the size that suits your yarn)
- Eyes: cotton yarn approx. 1.5 mm – black and white; 2.0 mm crochet hook
- Felt and a black marker or paint for the mouth
- Soft craft wire for the arms
- Tapestry needle, scissors, stuffing, stitch markers, glue gun
- Finished size: approx. 20 cm (8 in) tall. Use finer or bulkier yarn to make a smaller or larger Sprout.
Technique notes
- Work in a continuous spiral – do not join rounds with a slip stitch or turn unless stated. Mark the last stitch of each round with a stitch marker.
- The pattern uses US crochet terms.
- Read through the whole pattern before you start.
Abbreviations
| Abbr. | Meaning |
|---|---|
| Rnd | round |
| MR | magic ring |
| ch | chain |
| sc | single crochet |
| inc | increase (2 sc in 1 stitch) |
| dec | single crochet decrease (invisible decrease) |
| hdc | half double crochet |
| dc | double crochet |
| slst | slip stitch |
| FLO / BLO | front loop only / back loop only |
| bobble (4 dc) | bobble stitch made of 4 double crochet |
| (…) × n | repeat n times |
Arms (make 2)
Use red yarn.
- Rnd 1. MR 6 sc (6)
- Rnd 2. (sc, inc) × 3 (9)
- Rnd 3–4. 9 sc (9)
- Rnd 5. bobble (4 dc), 2 sc, dec, 2 sc, dec (7) – the bobble makes the thumb
- Rnd 6–15. 7 sc (7)
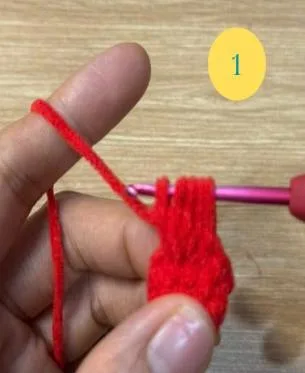
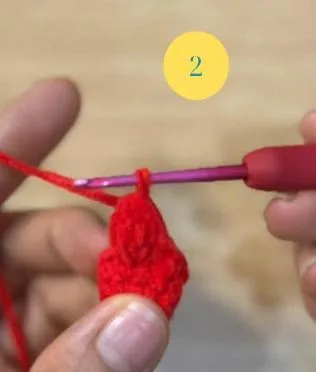
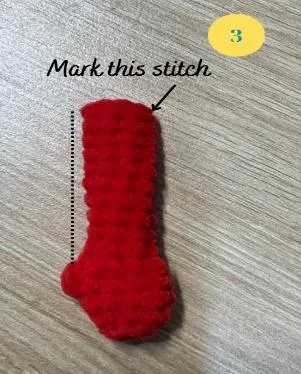
On Rnd 15, find the stitch in line with the bobble and place a stitch marker on the stitch opposite it – you'll join the arm to the body here. Stuff a little fiberfill into the tip of the hand and thread a piece of soft wire into the arm. Fasten off and hide the end inside.
Legs, body & head
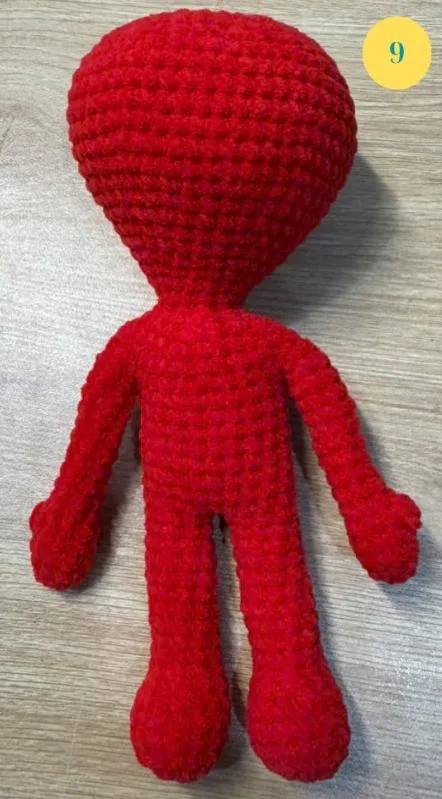
Use red yarn. The legs, body and head are worked in one piece.
Left leg
- Rnd 1. MR 6 sc (6)
- Rnd 2. 6 inc (12)
- Rnd 3. (3 sc, inc) × 3 (15)
- Rnd 4–5. 15 sc (15)
- Rnd 6. 3 sc, (sc, dec) × 3, 3 sc (12)
- Rnd 7. 4 sc, 2 dec, 4 sc (10) – start stuffing the foot
- Rnd 8–16. 10 sc (10)
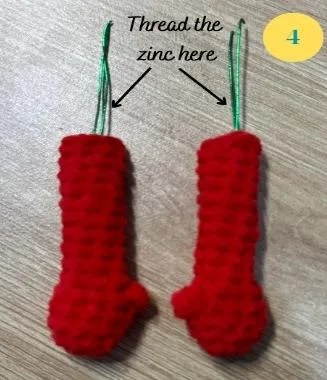
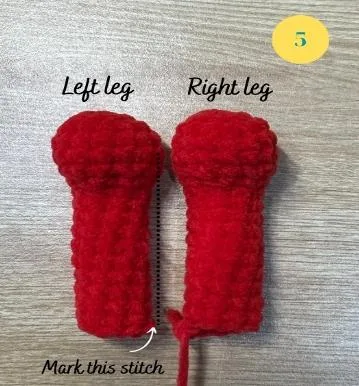
Stuff the leg firmly, fasten off and cut the yarn. Place a stitch marker in the middle stitch on the inside of the leg.
Right leg
Work as the left leg to the end of Rnd 16, then crochet 4–5 more sc so that your last stitch sits in the middle of the inside of the leg. Don't cut the yarn.
Body
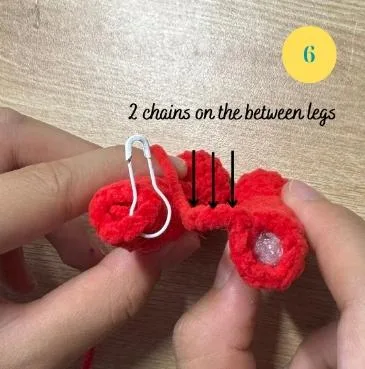
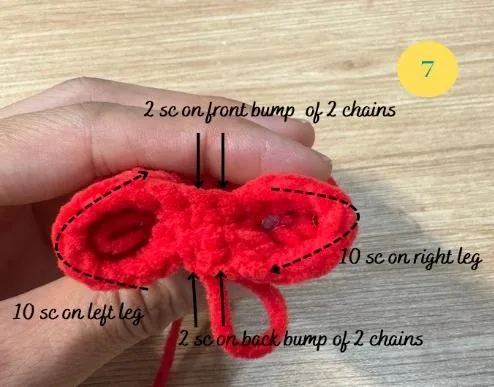
- Rnd 17. Join the legs: ch 2, 1 sc in the marked stitch of the left leg, 9 sc around the left leg, 2 sc in the back bumps of the 2 chains, 10 sc around the right leg, 2 sc in the front bumps of the 2 chains (24)
- Rnd 18–25. 24 sc (24) – the last stitch of Rnd 25 should be in the middle of the back
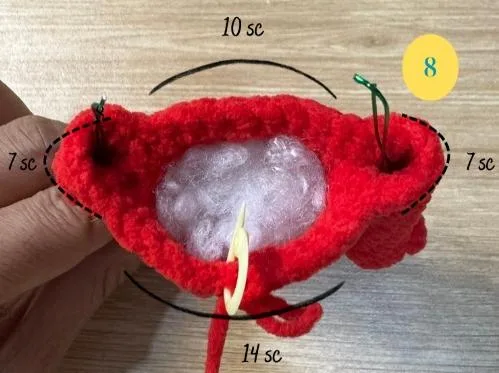
- Rnd 26. Join the arms: 7 sc on the body, 1 sc in the marked stitch of the left arm, 6 sc around the left arm, 10 sc on the body, 1 sc in the marked stitch of the right arm, 6 sc around the right arm, 7 sc on the body (38)
- Rnd 27. dec, 17 sc, dec, 17 sc (36) – start stuffing the body, don't stuff the arms
- Rnd 28. (4 sc, dec) × 6 (30)
- Rnd 29. (3 sc, dec) × 6 (24)
- Rnd 30. (sc, dec) × 8 (16)
- Rnd 31. (2 sc, dec) × 4 (12)
- Rnd 32. (3 sc, inc) × 3 (15)
Head
- Rnd 33. (2 sc, inc) × 5 (20)
- Rnd 34. 20 sc (20)
- Rnd 35. (3 sc, inc) × 5 (25)
- Rnd 36. (4 sc, inc) × 5 (30)
- Rnd 37. 30 sc (30)
- Rnd 38. (5 sc, inc) × 5 (35)
- Rnd 39. (6 sc, inc) × 5 (40)
- Rnd 40. 40 sc (40)
- Rnd 41. (7 sc, inc) × 5 (45)
- Rnd 42. (8 sc, inc) × 5 (50)
- Rnd 43. (9 sc, inc) × 5 (55)
- Rnd 44–47. 55 sc (55)
- Rnd 48. (9 sc, dec) × 5 (50)
- Rnd 49. (8 sc, dec) × 5 (45)
- Rnd 50. (7 sc, dec) × 5 (40)
- Rnd 51. (3 sc, dec) × 8 (32)
- Rnd 52. (2 sc, dec) × 8 (24) – stuff the head firmly
- Rnd 53. (sc, dec) × 8 (16)
- Rnd 54. 8 dec (8)
Fasten off, close the hole and hide the end inside.
Eyes (make 2)
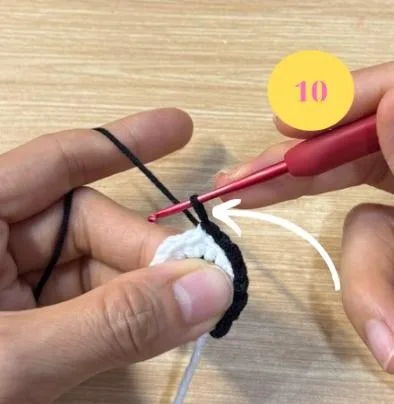
Start with black cotton. Work in joined rounds: slst into the first stitch to close each round, ch 1.
- Rnd 1. MR 6 sc (6)
- Rnd 2. 6 inc (12) – change to white, don't cut the black yarn
- Rnd 3. (sc, inc) × 2, hdc, 2 dc in the next stitch, hdc, 2 hdc in the next stitch, (sc, inc) × 2 (18) – change to black
- Rnd 4. BLO 18 slst (18) – after each slst, pull the loop up a little longer so the eye stays flat and doesn't curl
Face
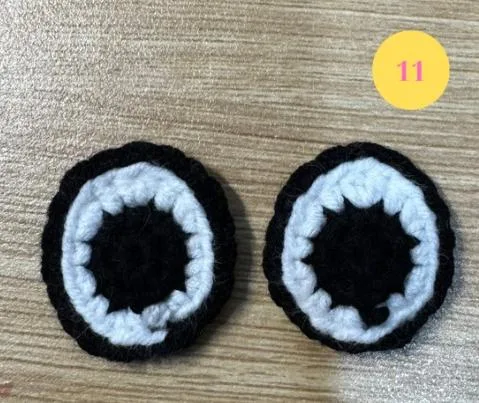
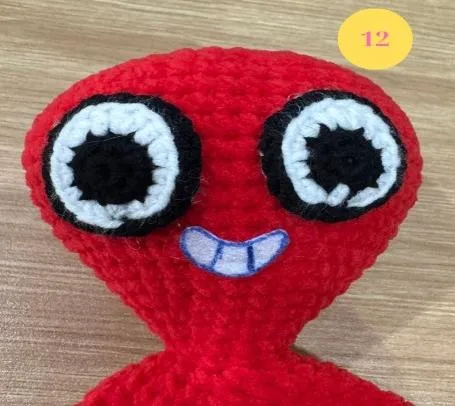
- Hot-glue the eyes between Rnd 41 and 46 of the head.
- Cut a smile from felt, draw the teeth with a black marker and glue it between Rnd 38 and 40.
Leaves (top of the head)
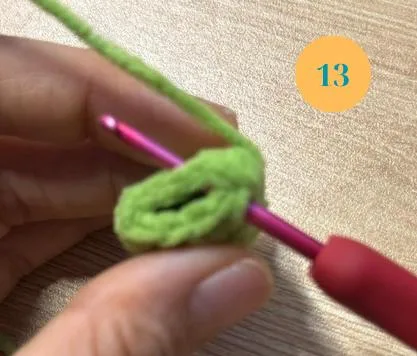
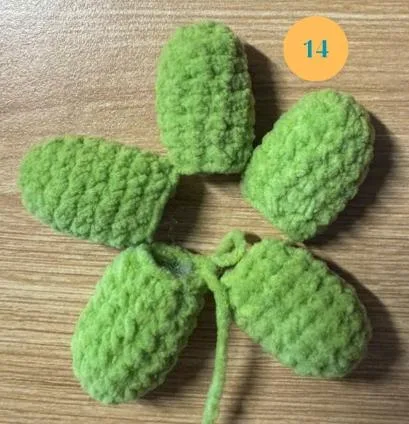
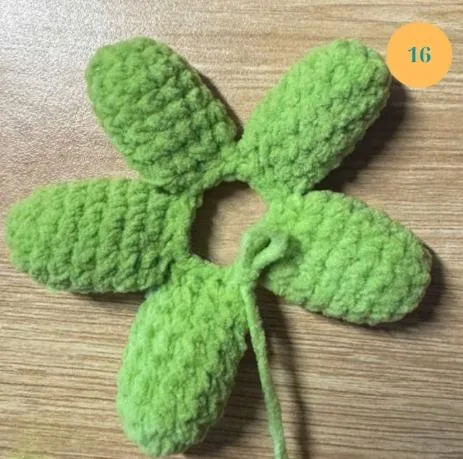
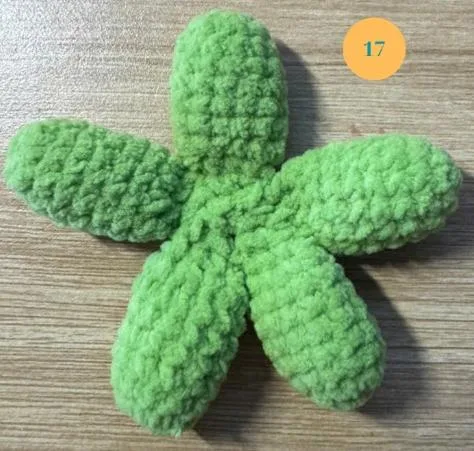
Use light green yarn. Make 5 leaves.
- Rnd 1. MR 6 sc (6)
- Rnd 2. 6 inc (12)
- Rnd 3–7. 12 sc (12)
- Rnd 8. (sc, dec) × 4 (8)
Flatten the opening and close it with 4 sc through both layers. Make 4 more leaves the same way.
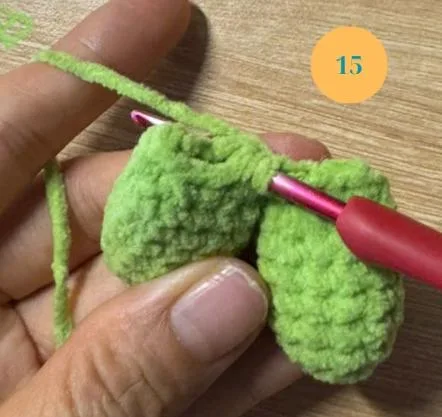
Join the 5 leaves into one piece:
- Rnd 9. 4 sc on each leaf (20)
- Rnd 10. 10 dec (10)
Thread the needle through the outer loops of the last 10 stitches, pull tight and hide the end. Hot-glue the leaves to the top of the head.
Scarf
Start with white yarn.
- Rnd 1. MR 6 sc (6)
- Rnd 2. (sc, inc) × 3 (9)
- Rnd 3. 9 sc (9) – change to light pink, don't cut the white yarn
- Rnd 4. 9 sc (9) – change to white, don't cut the pink yarn
- Rnd 5–60. 9 sc (9) – alternate colors: odd rounds white, even rounds light pink. Don't stuff.
- Rnd 61. with white: (sc, dec) × 3 (6)
Close the end through the last 6 stitches, pull tight and hide the yarn. Wrap the scarf around Sprout's neck.
FAQ
Is the Sprout crochet pattern beginner friendly?
It's an easy-to-intermediate amigurumi. You'll need the basics (magic ring, single crochet, increase, decrease) plus a bobble stitch for the thumbs. The legs, body and head are worked in one piece, so there's almost no sewing.
How do I make the arms posable?
Slide a piece of soft craft wire into each arm before you join it to the body (Pic 4). Fold the wire ends back so they can't poke through the yarn – and skip the wire if the toy is for a small child.
What size is the finished Sprout?
About 8 inches (20 cm) tall with chunky chenille yarn and a 2.5 mm hook – a great size for a Dandy's World gift, shelf display or craft fair.
Your Sprout is ready!
Congratulations – your little strawberry friend is finished! If you have any questions while making Sprout, send me a message – I'm always happy to help, and I'd love to see your finished toy. Tag @pt254297 on Instagram or Pinterest.
Want more Dandy's World characters? Check out the free Pebble crochet pattern, browse more amigurumi crochet patterns – or order a handmade Sprout if you'd rather not crochet one yourself – in my Etsy shop HandmadePhuongGifts. Favorite the shop to be the first to see new patterns.
This free pattern is for personal use. Please don't republish, resell or translate the pattern itself – share a link to this page instead. You're welcome to sell the finished toys if you credit HandmadePhuongGifts as the designer. Sprout is a character from the game Dandy's World; this is an unofficial fan-made pattern.